Evolution Items: Difference between revisions
No edit summary |
No edit summary |
||
| (35 intermediate revisions by 2 users not shown) | |||
| Line 1: | Line 1: | ||
Some Digimon evolutions require items to unlock the evolution in addition to the level and requirements for Ultimate. The most common item is [[File:Evoluter.png]] '''Evoluter''' and various '''Digicore''' for 100% chance of evolution. | Some Digimon evolutions require items to unlock the evolution in addition to the level and requirements for Ultimate. The most common item is [[File:Evoluter.png]] '''Evoluter''' and various '''Digicore''' for 100% chance of evolution. | ||
*'''NOTE:''' For [[Mastemon]] evolution you need 5 Holy Rings. | |||
* For [[Imperialdramon: Dragon Mode|<u>Imperialdramon: Dragon mode</u>]] evolution you need 1 Qinglongmon Digicore. [[Imperialdramon: Fighter Mode]] evolution need 11 Qinglongmon Digicore. | |||
* For [[Omegamon]] evolution you need 10 Holy Rinds + Valdurmon Feather | |||
* For [[BlackWarGreymon]] evolution you need 100 Archnemon Hair. | |||
{| class="wikitable" | {| class="wikitable" | ||
|+ | |+ | ||
| Line 9: | Line 18: | ||
|[[File:MetalTyranomon Icon.png|link=MetalTyranomon]] [[MetalTyranomon]] → [[File:Mugendramon Icon.png|link=Mugendramon]] [[Mugendramon]] | |[[File:MetalTyranomon Icon.png|link=MetalTyranomon]] [[MetalTyranomon]] → [[File:Mugendramon Icon.png|link=Mugendramon]] [[Mugendramon]] | ||
|- | |- | ||
| | |[[File:Chimairamon Icon.png|link=Chimairamon]] [[Chimairamon]] → [[File:Millenniumon Icon.png|link=Millenniumon]] [[Millenniumon]] | ||
|- | |- | ||
|[[File:Grudge SkullGreymon Born.png|center]] | |[[File:Grudge SkullGreymon Born.png|center]] | ||
| Line 15: | Line 24: | ||
|[[File:Digitamamon Icon.png|link=Digitamamon]] [[Digitamamon]] → [[File:Titamon Icon.png|link=Titamon]] [[Titamon]] | |[[File:Digitamamon Icon.png|link=Digitamamon]] [[Digitamamon]] → [[File:Titamon Icon.png|link=Titamon]] [[Titamon]] | ||
|- | |- | ||
| rowspan=" | | rowspan="18" |[[File:Holy Ring.png|center]] | ||
| rowspan=" | | rowspan="18" |Holy Ring | ||
|[[File:Tailmon Icon.png|link=Tailmon]] [[Tailmon]] → [[File:Silphymon Icon.png|link=Silphymon]] [[Silphymon]] | |[[File:Tailmon Icon.png|link=Tailmon]] [[Tailmon]] → [[File:Silphymon Icon.png|link=Silphymon]] [[Silphymon]] | ||
|- | |- | ||
| Line 23: | Line 32: | ||
|[[File:Baalmon Icon.png|link=Baalmon]] [[Baalmon]] → [[File:NeoVamdemon Icon.png|link=NeoVamdemon]] [[NeoVamdemon]] | |[[File:Baalmon Icon.png|link=Baalmon]] [[Baalmon]] → [[File:NeoVamdemon Icon.png|link=NeoVamdemon]] [[NeoVamdemon]] | ||
|- | |- | ||
|[[File:Jokermon Icon.png|link=Jokermon]] [[Jokermon]] → [[File:NeoVamdemon Icon.png|link=NeoVamdemon]] [[NeoVamdemon]] | | [[File:Jokermon Icon.png|link=Jokermon]] [[Jokermon]] → [[File:NeoVamdemon Icon.png|link=NeoVamdemon]] [[NeoVamdemon]] | ||
|- | |- | ||
|[[File:Devimon Icon.png|link=Devimon]] [[Devimon]] → [[File:SkullSatamon Icon.png|link=SkullSatamon]] [[SkullSatamon]] | |[[File:Devimon Icon.png|link=Devimon]] [[Devimon]] → [[File:SkullSatamon Icon.png|link=SkullSatamon]] [[SkullSatamon]] | ||
| Line 29: | Line 38: | ||
|[[File:Orgemon Icon.png|link=Orgemon]] [[Orgemon]] → [[File:SkullSatamon Icon.png|link=SkullSatamon]] [[SkullSatamon]] | |[[File:Orgemon Icon.png|link=Orgemon]] [[Orgemon]] → [[File:SkullSatamon Icon.png|link=SkullSatamon]] [[SkullSatamon]] | ||
|- | |- | ||
| | | [[File:Angewomon Icon.png|link=Angewomon]] [[Angewomon]] → [[File:Mastemon Icon.png|link=Mastemon]] [[Mastemon]] | ||
|- | |||
|[[File:LadyDevimon Icon.png|link=LadyDevimon]] [[LadyDevimon]] → [[File:Mastemon Icon.png|link=Mastemon]] [[Mastemon]] | |||
|- | |||
|[[File:FlareLizamon Icon.png|link=FlareLizamon]] [[FlareLizamon]] → [[File:Mummymon Icon.png|link=Mummymon]] [[Mummymon]] | |||
|- | |||
|[[File:Minotaurmon Icon.png|link=Minotaurmon]] [[Minotaurmon]] → [[File:Mummymon Icon.png|link=Mummymon]] [[Mummymon]] | |||
|- | |||
|[[File:XV-mon Icon.png|link=XV-mon]] [[XV-mon]] → [[File:Paildramon Icon.png|link=Paildramon]] [[Paildramon]] | |||
|- | |||
|[[File:Stingmon Icon.png|link=Stingmon]] [[Stingmon]] → [[File:Paildramon Icon.png|link=Paildramon]] [[Paildramon]] | |||
|- | |||
|[[File:Angemon Icon.png|link=Angemon]] [[Angemon]] → [[File:Shakkoumon Icon.png|link=Shakkoumon]] [[Shakkoumon]] | |||
|- | |||
|[[File:Ankylomon Icon.png|link=Ankylomon]] [[Ankylomon]] → [[File:Shakkoumon Icon.png|link=Shakkoumon]] [[Shakkoumon]] | |||
|- | |||
|[[File:Gomamon Icon.png|link=Gomamon]] [[Gomamon]] → [[File:Rukamon Icon.png|link=Rukamon]] [[Rukamon]] | |||
|- | |||
|[[File:Penmon Icon.png|link=Penmon]] [[Penmon]] → [[File:Rukamon Icon.png|link=Rukamon]] [[Rukamon]] | |||
|- | |||
|[[File:WarGreymon Icon.png|link=WarGreymon]] [[WarGreymon]] → [[File:Omegamon Icon.png|link=Omegamon]] [[Omegamon]] | |||
|- | |- | ||
| | |[[File:MetalGarurumon Icon.png|link=MetalGarurumon]] [[MetalGarurumon]] → [[File:Omegamon Icon.png|link=Omegamon]] [[Omegamon]] | ||
|- | |- | ||
| rowspan="2" |[[File:Zhuqiaomon Force.png|center]] | | rowspan="2" |[[File:Zhuqiaomon Force.png|center]] | ||
| rowspan="2" |Zhuqiaomon Force | | rowspan="2" |Zhuqiaomon Force | ||
|[[File:Baalmon Icon.png|link=Baalmon]] [[Baalmon]] → [[File:Beelzebumon (2010) Icon.png|link=Beelzebumon (2010)]] [[Beelzebumon (2010)]] | |[[File:Baalmon Icon.png|link=Baalmon]] [[Baalmon]] → [[File:Beelzebumon (2010) Icon.png|link=Beelzebumon (2010)]] [[Beelzebumon (2010)]] | ||
|- | |- | ||
| Line 42: | Line 71: | ||
|Chimairamon Data | |Chimairamon Data | ||
|[[File:SkullGreymon Icon.png|link=SkullGreymon]] [[SkullGreymon]] → [[File:Chimairamon Icon.png|link=Chimairamon]] [[Chimairamon]] | |[[File:SkullGreymon Icon.png|link=SkullGreymon]] [[SkullGreymon]] → [[File:Chimairamon Icon.png|link=Chimairamon]] [[Chimairamon]] | ||
|- | |||
| rowspan="3" |[[File:Root of Evil.png|center]] | |||
| rowspan="3" |Root of Evil | |||
|[[File:Ophanimon Icon.png|link=Ophanimon]] [[Ophanimon]] → [[File:Lilithmon Icon.png|link=Lilithmon]] [[Lilithmon]] | |||
|- | |||
|[[File:Ophanimon Icon.png|link=Ophanimon]] [[Ophanimon]] → [[File:Ophanimon Falldown Mode Icon.png|link=Ophanimon: Falldown Mode]] [[Ophanimon: Falldown Mode]] | |||
|- | |||
|[[File:Seraphimon Icon.png|link=Seraphimon]] [[Seraphimon]] → [[File:BlackSeraphimon Icon.png|link=BlackSeraphimon]] [[BlackSeraphimon]] | |||
|- | |||
| rowspan="2" |[[File:Qinglongmon Digicore.png|center]] | |||
| rowspan="2" |Qinglongmon Digicore | |||
|[[File:Paildramon Icon.png|link=Paildramon]] [[Paildramon]] → [[File:Imperialdramon Dragon Mode Icon.png|link=Imperialdramon: Dragon Mode]] [[Imperialdramon: Dragon Mode]] | |||
|- | |||
|[[File:Imperialdramon Dragon Mode Icon.png|link=Imperialdramon: Dragon Mode]] [[Imperialdramon: Dragon Mode]] → [[File:Imperialdramon Fighter Mode Icon.png|link=Imperialdramon: Fighter Mode]] [[Imperialdramon: Fighter Mode]] | |||
|- | |||
|[[File:Kuzuhamon Miko Mode Weapon.png|center]] | |||
|Kuzuhamon Miko Mode Weapon | |||
|[[File:Kuzuhamon Icon.png|link=Kuzuhamon]] [[Kuzuhamon]] → [[File:Kuzuhamon Miko Mode Icon.png|link=Kuzuhamon: Miko Mode]] [[Kuzuhamon: Miko Mode]] | |||
|- | |||
|[[File:Non-evolutionary Will.png|center]] | |||
|Non-evolutionary Will | |||
|[[File:Pinochimon Icon.png|link=Pinochimon]] [[Pinochimon]] → [[File:Apocalymon Icon.png|link=Apocalymon]] [[Apocalymon]] | |||
|- | |||
| rowspan="2" |[[File:Valdurmon Feather.png|center]] | |||
| rowspan="2" |Valdurmon Feather | |||
|[[File:WarGreymon Icon.png|link=WarGreymon]] [[WarGreymon]] → [[File:Omegamon Icon.png|link=Omegamon]] [[Omegamon]] | |||
|- | |||
|[[File:MetalGarurumon Icon.png|link=MetalGarurumon]] [[MetalGarurumon]] → [[File:Omegamon Icon.png|link=Omegamon]] [[Omegamon]] | |||
|- | |||
|[[File:Apocalymon Own Thoughts.png|center]] | |||
|Apocalymon Own Thoughts | |||
|[[File:Devidramon Icon.png|link=Devidramon]] [[Devidramon]] → [[File:Mephismon Icon.png|link=Mephismon]] [[Mephismon]] | |||
|- | |||
|[[File:Omega Blade.png|center]] | |||
|Omega Blade | |||
|[[File:Imperialdramon Fighter Mode Icon.png|link=Imperialdramon: Fighter Mode]] [[Imperialdramon: Fighter Mode]] → [[File:Imperialdramon Paladin Mode Icon.png|link=Imperialdramon: Paladin Mode]] [[Imperialdramon: Paladin Mode]] | |||
|- | |||
|[[File:Grani.png|center]] | |||
|Grani | |||
|[[File:Dukemon Icon.png|link=Dukemon]] [[Dukemon]] → [[File:Dukemon Crimson Mode Icon.png|link=Dukemon: Crimson Mode]] [[Dukemon: Crimson Mode]] | |||
|- | |||
|[[File:Archnemon Hair.png|center]] | |||
|Archnemon Hair | |||
|[[File:MetalGreymon (Virus) Icon.png|link=MetalGreymon (Virus)]] [[MetalGreymon (Virus)]] → [[File:BlackWarGreymon Icon.png|link=BlackWarGreymon]] [[BlackWarGreymon]] | |||
|} | |} | ||
===How to get these items?=== | ===How to get these items? === | ||
=== Evoluter === | ===Evoluter=== | ||
[[File:Evoluter_Craft.png|frameless|577x577px]] | [[File:Evoluter_Craft.png|frameless|577x577px]] | ||
| Line 52: | Line 125: | ||
=== Holy Ring === | ===Holy Ring=== | ||
[[File:Holy Ring.png|left|frameless]] | [[File:Holy Ring.png|left|frameless]] | ||
Can be obtained while '''deleting any digimon (around 50% chance to get the item) that has a holy ring on it's body'''. Examples: Gatomon/Tailmon, Salamon/Plotmon, Angewomon, Bakumon/Tapirmon, Apemon/Hanumon. Parrotmon and Houmon can sometimes give you 2 rings when deleted. | Can be obtained while '''deleting any digimon (around 50% chance to get the item) that has a holy ring on it's body'''. Examples: Gatomon/Tailmon, Salamon/Plotmon, Angewomon, Bakumon/Tapirmon, Apemon/Hanumon. Parrotmon and Houmon can sometimes give you 2 rings when deleted. | ||
=== Grudge SkullGreymon Bone === | ===Grudge SkullGreymon Bone=== | ||
[[File:Item_Icon_SmallRaider_D.png|left|frameless|82x82px]] | [[File:Item_Icon_SmallRaider_D.png|left|frameless|82x82px]] | ||
| Line 66: | Line 139: | ||
=== '''Mugendramon Parts''' === | ==='''Mugendramon Parts'''=== | ||
Only craftable via a '''recipe''' unlocked by the achievement below. '''This recipe requires crafting to be at level 130 or higher to be learned. Parts can be bought from the auction house from other players and will count towards the achievement'''. | Only craftable via a '''recipe''' unlocked by the achievement below. '''This recipe requires crafting to be at level 130 or higher to be learned. Parts can be bought from the auction house from other players and will count towards the achievement'''. | ||
[[File:Mugendramon Parts recipe.png|thumb|491x491px|Final crafting method to combine all parts. costs 500,000 bits and never fails.]] | [[File:Mugendramon Parts recipe.png|thumb|491x491px|Final crafting method to combine all parts. costs 500,000 bits and never fails.]] | ||
| Line 108: | Line 181: | ||
=== Zhuqiaomon Force === | ===Zhuqiaomon Force=== | ||
This item can to be bought from the [[Rifts|Tentomon Rift NPC]] using 200 green datas. It is Required to evolve Baalmon into mega. | This item can to be bought from the [[Rifts|Tentomon Rift NPC]] using 200 green datas. It is Required to evolve Baalmon into mega. | ||
[[File:Zhuqiaomon_Flame.png|frameless]] | [[File:Zhuqiaomon_Flame.png|frameless]] | ||
=== Chimairamon Data === | ===Chimairamon Data=== | ||
Kimeramon has a similar obtaning process to Machinedramon, where some digimon have to be deleted for items and other items need to be farmed or obtained through other methods. | Kimeramon has a similar obtaning process to Machinedramon, where some digimon have to be deleted for items and other items need to be farmed or obtained through other methods. | ||
It consists of 9 parts that are combined via crafting into 2 groups ( Parts A and B), then one final item (Chimairamon Data) that is responsible for the Skullgreymon Evolution. | It consists of 9 parts that are combined via crafting into 2 groups ( Parts A and B), then one final item (Chimairamon Data) that is responsible for the Skullgreymon Evolution. | ||
* Both crafting recipes require crafting level 100 or higher. | *Both crafting recipes require crafting level 100 or higher. | ||
* Upon Crafting Part A and Part B you will '''receive an achievement''' reward that gives you the Chimairamon Data crafting recipe. | *Upon Crafting Part A and Part B you will '''receive an achievement''' reward that gives you the Chimairamon Data crafting recipe. | ||
'''Parts A '''- Recipe can be exchanged at [[Árvore do Mundo|Cherrymon]] using 60 Leaf data. | '''Parts A '''- Recipe can be exchanged at [[Árvore do Mundo|Cherrymon]] using 60 Leaf data. | ||
| Line 141: | Line 214: | ||
For the Parts B you will need: | For the Parts B you will need: | ||
[[File:Kuwagamon Arm.png|frameless]]'''x1 Kuwagamon Arm (Exchanged at the Dekyu Treasure Box NPC)-Tradeable''' | [[File:Kuwagamon Arm.png|frameless]]'''x1 Kuwagamon Arm (Exchanged at the Dekyu Treasure Box NPC. Can also be exchanged via Ophanimon Raid NPC)-Tradeable''' | ||
[[File:Devimon Arm.png|frameless]]'''x1 Devimon Arm (Dropped at the Devimon Rift Boss located in Infinity Mountain at a chance)-Tradeable''' | [[File:Devimon Arm.png|frameless]]'''x1 Devimon Arm (Dropped at the Devimon Rift Boss located in Infinity Mountain at a chance)-Tradeable''' | ||
Latest revision as of 08:51, 19 December 2024
Some Digimon evolutions require items to unlock the evolution in addition to the level and requirements for Ultimate. The most common item is ![]() Evoluter and various Digicore for 100% chance of evolution.
Evoluter and various Digicore for 100% chance of evolution.
- NOTE: For Mastemon evolution you need 5 Holy Rings.
- For Imperialdramon: Dragon mode evolution you need 1 Qinglongmon Digicore. Imperialdramon: Fighter Mode evolution need 11 Qinglongmon Digicore.
- For Omegamon evolution you need 10 Holy Rinds + Valdurmon Feather
- For BlackWarGreymon evolution you need 100 Archnemon Hair.
How to get these items?
Evoluter
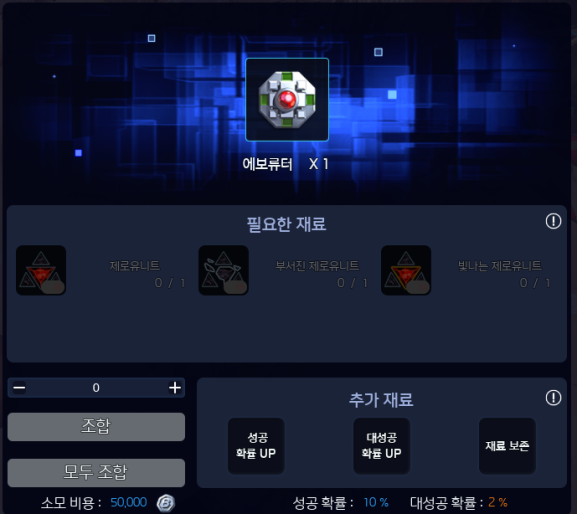
Evoluters can be obtained through events and main story quests starting on the Real world(Odaiba) section at the end of the third map (Subway Station). Upon completing the main quests in the fourth odaiba map (Odaiba Entrance) you receive a second evoluter and this recipe that allows you to craft more. A third and fourth evoluter can be obtained in the following maps through main quests. Notice that through crafting you only have a 10% success rate on getting Evoluters.
Holy Ring
Can be obtained while deleting any digimon (around 50% chance to get the item) that has a holy ring on it's body. Examples: Gatomon/Tailmon, Salamon/Plotmon, Angewomon, Bakumon/Tapirmon, Apemon/Hanumon. Parrotmon and Houmon can sometimes give you 2 rings when deleted.
Grudge SkullGreymon Bone
Can be dropped from the level 70 SkullGreymon rift boss. This rift item (shown on the left) can be obtained through most of the dark castle valley map's enemies, chuumon 70 is a popular farming spot for it.
Level 65~70 Rift. Skullgreymon is level 70 so use a team of level 80 or lower for best results.
Mugendramon Parts
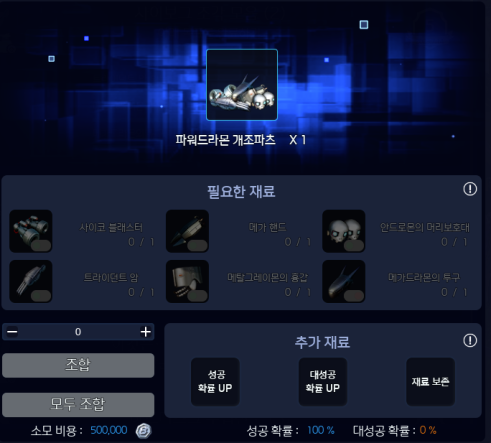
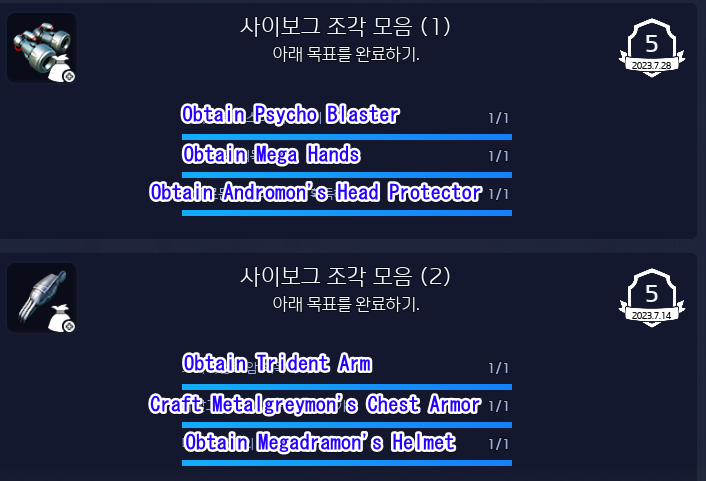
Only craftable via a recipe unlocked by the achievement below. This recipe requires crafting to be at level 130 or higher to be learned. Parts can be bought from the auction house from other players and will count towards the achievement.
To complete Cyborg Defragmentation (1) and (2) you must:
The following digimon must be deleted in your island to receive the parts:
-Metal Mamemon( Evolves from elecmon violet-> Thunderballmon). Gives you the Psycho Blaster.
-Metal Greymon (Evolution Line does not matter).Gives you the Trident Arm
-Megadramon( Evolves from Biyomon-> Airdramon). Gives you the Mega Hands.
The following parts have other obtaning methods:
-Andromon's Head Protector : can be dropped from the rift boss Andromon level 60 when defeating him in Gear Savannah.
This is the rift item used, it can be farmed on most of the Infinity Mountain map.![]() (Bakemon 37/ Ikakkumon 51/Yukidarumon 57 are good enemies to farm this item from)
(Bakemon 37/ Ikakkumon 51/Yukidarumon 57 are good enemies to farm this item from)
-Megadramon's Helmet: can be obtained from Cherrymon NPC using his exchange ( Requires finishing all story quests).
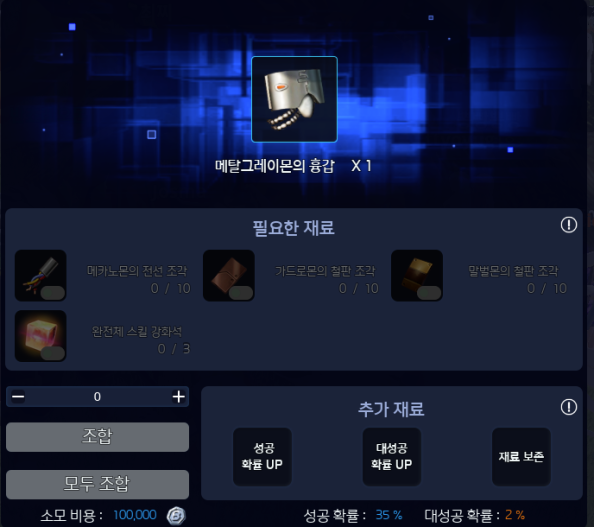
-Metalgreymon's Chest Armor: the recipe to craft this part can be exchanged at Tentomon NPC using green datas obtained from Rifts.
To craft the chest armor you will need:
x10 Mechanorimon resistor (Desert Area)
x10 Guardromon iron plate ( Desert Area)
x10 Waspmon Armor (Desert Area)
x3 Ultimate Skill cube (Tradeable)
Zhuqiaomon Force
This item can to be bought from the Tentomon Rift NPC using 200 green datas. It is Required to evolve Baalmon into mega.
Chimairamon Data
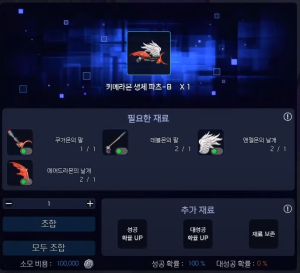
Kimeramon has a similar obtaning process to Machinedramon, where some digimon have to be deleted for items and other items need to be farmed or obtained through other methods. It consists of 9 parts that are combined via crafting into 2 groups ( Parts A and B), then one final item (Chimairamon Data) that is responsible for the Skullgreymon Evolution.
- Both crafting recipes require crafting level 100 or higher.
- Upon Crafting Part A and Part B you will receive an achievement reward that gives you the Chimairamon Data crafting recipe.
Parts A - Recipe can be exchanged at Cherrymon using 60 Leaf data.
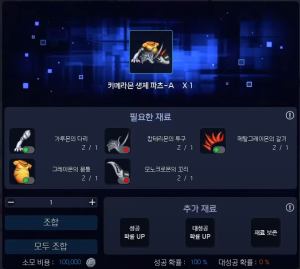
For the Parts A you will need:
![]() x1 Garurumon's Leg (Obtained at a chance when deleting Garurumon)-Tradeable
x1 Garurumon's Leg (Obtained at a chance when deleting Garurumon)-Tradeable
![]() x1 Metal Greymon Mane (Obtained at a chance when deleting Metal Greymon)-Tradeable
x1 Metal Greymon Mane (Obtained at a chance when deleting Metal Greymon)-Tradeable
![]() x1 Greymon Torso (Dropped from Greymon lvl80 in Hill Of Light)-Tradeable
x1 Greymon Torso (Dropped from Greymon lvl80 in Hill Of Light)-Tradeable
![]() x1 Kabuterimon Helm (Dropped from Kabuterimon lvl77 in Dark Castle Valley)-Not Tradeable
x1 Kabuterimon Helm (Dropped from Kabuterimon lvl77 in Dark Castle Valley)-Not Tradeable
![]() x1 Monochromon Tail (Dropped from Monochromon lvl50 in Desert Area)-Not Tradeable
x1 Monochromon Tail (Dropped from Monochromon lvl50 in Desert Area)-Not Tradeable
Parts B - Recipe can be exchanged at Biyomon using 180 Leaf data.
For the Parts B you will need:
![]() x1 Kuwagamon Arm (Exchanged at the Dekyu Treasure Box NPC. Can also be exchanged via Ophanimon Raid NPC)-Tradeable
x1 Kuwagamon Arm (Exchanged at the Dekyu Treasure Box NPC. Can also be exchanged via Ophanimon Raid NPC)-Tradeable
![]() x1 Devimon Arm (Dropped at the Devimon Rift Boss located in Infinity Mountain at a chance)-Tradeable
x1 Devimon Arm (Dropped at the Devimon Rift Boss located in Infinity Mountain at a chance)-Tradeable
![]() x1 Angemon Wing (Obtained at a chance when deleting Angemon)-Tradeable
x1 Angemon Wing (Obtained at a chance when deleting Angemon)-Tradeable
![]() x1 Airdramon Wing (Dropped from Airdramon lvl84 in Subway Station)- Tradeable
x1 Airdramon Wing (Dropped from Airdramon lvl84 in Subway Station)- Tradeable
